
A gem of a book!
Great paper products on a budget!
Which Ewe Are You?
Crafty Chica Glitter Give-Away!
Blog Home
Archive
July 2009
June 2009
May 2009
April 2009
March 2009
February 2009
January 2009
December 2008
November 2008
October 2008
September 2008
August 2008
July 2008
June 2008
May 2008
April 2008
March 2008
Subscribe to PCN
RSS Feed
Newsletter Signup
Thom’s Project, Part 2
posted on July 18, 2008
My name is Thom and I’m the Editorial Assistant at Potter Craft. To me, making a craft project is always half inspiration and preparation and half actually putting the pieces together. With that in mind, I invite you to come with me on the two-part journey of a newly minted sewer on the trail of his second project.
Part 2: Attaching Things to Other Things
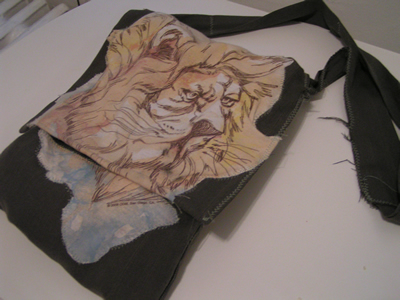
So where were we? Lions and dress-pant-like material? Well that’s where my mind was anyway, on that fateful Saturday as I headed home on the B63. A short bus ride and walk down the street later I was back at my apartment.
Before I describe the project, I want to give a disclaimer: Amy Karol wrote my go-to reference book-aptly titled Bend-the-Rules Sewing - but if I had to describe my own style it would be more along the lines of “There-Are-No-Rules Sewing.” I have yet to actually think about inches or test a stitch before I begin to make something.
So, leaving the measuring to those who measure, I folded the gray fabric in half and then mostly in half again. This created a quadruple-layered rectangle (two layers for each side of the bag = a more durable bag). Next, I shifted it quite a bit so that extra fabric stuck out from the top. Boom! An instant flap. Then I cut out the lion head from the t-shirt and sliced it horizontally into two pieces. Scooting the materials to the side, I put my sewing machine on the table and revved it up.
I used my bargain thread, which turned out to be Coats and Clark (the color on the left here), to sew the top 4/5ths of the lion on the flap and the bottom 1/5th of the lion on what would be the front of the bag. I used pins to hold the form of the bag in place so that the design would line up after I sewed the pieces together. For me, that was fancy.
An hour later I had my bag. After another forty minutes, some foul language, and plenty of ripped out stitches, I had a bag with a strap. With that, I leave you to the result:
— Thom
CommentsComments will be posted after review by blog moderators
You caught my curiosity a while back with your lion-t posting and now I love your bag, the contrasting thread that magnifies your beginner stitches and your wonderful story of creation.
it might require some advanced planning but adding a magnetic snap in between the double layers would be a hip way to secure your valuables commuting on the B63.
Tthanks for all the fun!
nancy from 21centurydressmakers
Posted by: Nancy Minsky at August 10, 2008 12:51 PM