|
If you love good food writing and want to understand how and why
something is done the way it's done, there is no better guide than
Mastering the Art of French Cooking. As Julia states in her Introduction
to the 40th Anniversary Edition, "How about eight pages on making a
simple omelet?" Her point is that even simple dishes can be described in
detail, especially if they're a simple but classic dish like an omelet
(or "omelette," as she called them in the original edition). Most
omelets you'll eat in the U.S. are heavy, over-cooked masses. Not so
Julia's omelet, as you'll find from the text here. This recipe (with
variations) is a good example of the loving detail with which Mastering
introduces the great dishes of France to the American cook.
L'Omelette Brouillée -
L'Omelette Roulée -
Garnishings and Fillings for Omelettes
OMELETTES
A good French omelette is a smooth, gently
swelling, golden oval that is tender and creamy inside. And as it takes
less than half a minute to make, it is ideal for a quick meal. There is
a trick to omelettes, and certainly the easiest way to learn is to ask
an expert to give you a lesson. Nevertheless we hope one of the two
techniques we describe will enable you, if you have never made an
omelette before, to produce a good one. The difficulty with all written
recipes for omelettes is that before you even start to make one you must
read, remember, and visualize the directions from beginning to end, and
practice the movements. For everything must go so quickly once the eggs
are in the pan that there is no time at all to stop in the middle and
pore over your book in order to see what comes next. Learning to make a
good omelette is entirely a matter of practice. Do one after another for
groups of people every chance you get for several days, and even be
willing to throw some away. You should soon develop the art, as well as
your own personal omelette style.
The two methods set forth here are rapid, professional techniques. The
first is the simplest. The second takes more manual skill.
Omelette Pans
An omelette cannot be made in a sticky pan; the eggs must be able to
slide around freely, and if they cannot, you simply cannot make an
omelette at all. Since the first edition of this book, professionally
shaped omelette pans of heavy aluminum with no-stick interiors are
everywhere available, and that's what we use--gratefully. However, the
great omelette maker Dione Lucas insisted on her specially made
cast-aluminum pan half an inch thick, while that other famous omelette
queen Mme Romaine de Lyon and many another French cook swear only by
the plain iron pan 1/8 inch thick like the one in our illustrations.
Whatever you buy, you should have the long handle and the
straight-sloping sides 2 inches deep; the bottom diameter should be
about 7 inches, since this is the perfect size for the perfect 2- to
3-egg omelette.
If you prefer the French iron pan illustrated, you must first scrub it
with steel wool and scouring powder, rinse and dry it, then heat it for
a minute or two just until its bottom is too hot for your hand. Rub it
with paper towels and cooking oil and let it stand overnight. Before
making your first omelette, sprinkle a teaspoon of table salt in the
pan, heat it again, and rub vigorously for a moment with paper towels;
rub the pan clean, and it is ready for an omelette. If the pan is used
only for omelettes (a wise decision), it needs no washing afterwards;
merely rub it clean with paper towels. If the pan is washed, dry, warm,
and oil it lightly before putting it away. If it becomes sticky again,
rub again with salt. Never allow any pan, particularly an iron one, to
sit empty over heat--this does something to its internal structure so
that foods stick to it forevermore.
Eggs and How to Beat Them
An omelette can contain up to 8 eggs, but the individual 2- to 3-egg
omelette is usually the tenderest, and by far the best size to
practice making. At under 30 seconds an omelette, a number of people can
be served in a very short time. In fact, unless you are extremely expert
and have a restaurant-size heat source, we do not recommend larger
omelettes at all. But if you do want to attempt them, be sure to have
the correct size of pan. The depth of the egg mass in the pan should not
be over 1/4 inch, as the eggs must cook quickly. A pan with a 7-inch
bottom is right for the 2- to 3-egg omelette; a 10- to 11-inch pan is
required for 8 eggs.
Just before heating the butter in the pan, break the eggs into a mixing
bowl and add salt and pepper. With a large table fork, beat the eggs only
enough to blend the whites and yolks thoroughly. From 30 to 40 vigorous
strokes should be sufficient.
If you are making several 2- to 3-egg omelettes, beat the necessary
number of eggs and seasonings together in a large mixing bowl, and
provide yourself with a ladle or measure. Two U.S. large eggs measure about 6 tablespoons;
3 eggs, about 9 tablespoons. Measure out the required quantity for each
omelette as you are ready to make it, giving the eggs 4 or 5 vigorous
beats before dipping them out with your measure.
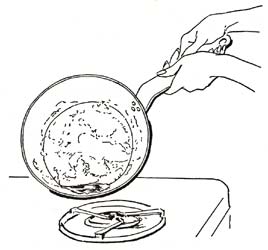
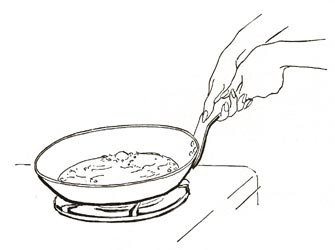
Transferring the Omelette from Pan to Plate
In each of the methods described, the finished omelette ends up in the
far lip of the pan. This is the way to transfer it from the pan to the
plate.
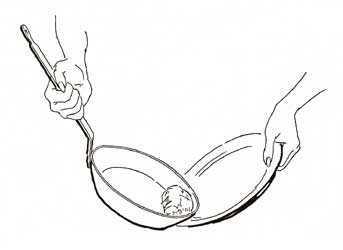
Hold the plate in your left hand. Turn the omelette pan so its handle is
to your right. Grasp the handle with your right hand, thumb on top. Rest
the lip of the pan slightly off the center of the plate so the omelette
will land in the middle of the plate. Then tilt plate and pan against
each other at a 45-degree angle.
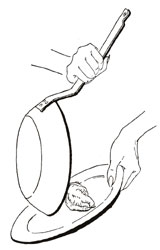
Quickly turn the pan upside down over the plate and the omelette will drop into position.
If it has not formed neatly, push it into shape with the back of a fork.
Rub the top of the omelette with softened butter and serve as soon as
possible, for omelettes toughen if they are kept warm.
L'OMELETTE BROUILLÉE
[Scrambled Omelette]
This is best in a French omelette pan, but a skillet can be used.
For 1 omelette, 1 to 2 servings. Time: Less than 30 seconds of cooking
2 or 3 eggs
Big pinch of salt
Pinch of pepper
A mixing bowl
A table fork
Beat the eggs and seasonings in the mixing bowl for 20 to 30 seconds until the whites and yolks are just blended.
1 Tb butter
An omelette pan 7 inches in diameter at the bottom
A table fork
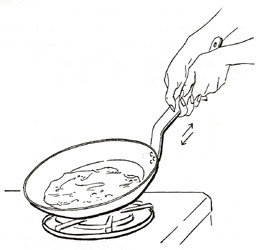
Place the butter in the pan and set over very high heat. If you have an
electric heat element, it should be red hot. As the butter melts, tilt
the pan in all directions to film the sides. When you see that the foam
has almost subsided in the pan and the butter is on the point of
coloring, it is an indication that it is hot enough to pour in the eggs.
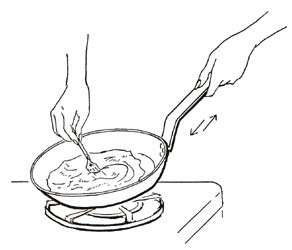
Hold the panhandle with your left hand, thumb on top, and immediately
start sliding the pan back and forth rapidly over the heat. At the same
time, fork in right hand, its flat side against the bottom of the pan,
stir the eggs quickly to spread them continuously all over the bottom of
the pan as they thicken. In 3 or 4 seconds they will become a light,
broken custard. (A filling would go in at this point.)
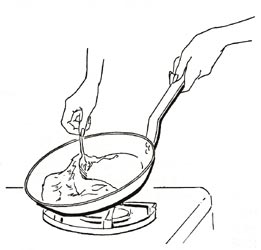
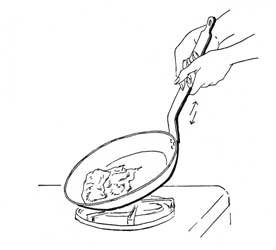
Then lift the handle of the pan to tilt it at a 45-degree angle over the
heat, and rapidly gather the eggs at the far lip of the pan with the
back of your fork. Still holding the pan tilted over the heat, run your
fork around the lip of the pan under the far edge of the omelette to be
sure it has not adhered to the pan.
Give 4 or 5 short, sharp blows on the handle of the pan with your right
fist to loosen the omelette and make the far edge curl over onto
itself.
Hold the pan tilted over heat for 1 or 2 seconds to brown the bottom of
the omelette very lightly, but not too long or the eggs will overcook.
The center of the omelette should remain soft and creamy.
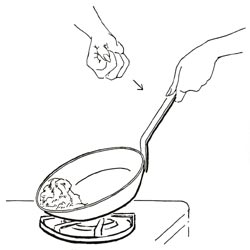
A warm plate
Softened butter
Turn the omelette onto the plate as illustrated on page 128, rub the top with a bit of butter, and serve as soon as possible.
L'OMELETTE ROULÉE
[Rolled Omelette]
This omelette should be made in a French omelette pan and a high gas
flame is usually more successful than an electric heat element. The
rolled omelette is the most fun of any method, but requires more
practice. Here the pan is jerked over high heat at an angle so
that the egg mass is continually hurled against the far lip of the pan
until the eggs thicken. Finally, as the pan is tilted further while it
is being jerked, the eggs roll over at the far lip of the pan, forming
an omelette shape. A simple-minded but perfect way to master the
movement is to practice outdoors with half a cupful of dried beans. As
soon as you are able to make them flip over themselves in a group, you
have the right feeling; but the actual omelette-making gesture is
sharper and rougher.
For 1 omelette, 1 to 2 servings. Time: Less than 30 seconds of cooking
2 or 3 eggs
Big pinch of salt
Pinch of pepper
A mixing bowl
A table fork
Beat the eggs and seasonings in the mixing bowl for 20 to 30 seconds until the whites and yolks are just blended.
1 Tb butter
An omelette pan 7 inches in diameter at the bottom
A table fork
Place the butter in the pan and set over very high heat. As the butter
melts, tilt the pan in all directions to film the sides. When you see
that the foam has almost subsided in the pan and the butter is on the
point of coloring (indicating it is hot enough), pour in the eggs. It is
of utmost importance in this method that the butter be of the correct
temperature.
Let the eggs settle in the pan for 2 or 3 seconds to form a film of coagulated egg in the bottom of the pan.
Grasp the handle of the pan with both hands, thumbs on top, and immediately begin jerking the pan vigorously and roughly toward you at an even, 20-degree angle over the heat, one jerk per second.
It is the sharp pull of the pan toward you which throws the eggs against
the far lip of the pan, then back over its bottom surface. You must have
the courage to be rough or the eggs will not loosen themselves from the
bottom of the pan. After several jerks, the eggs will begin to thicken.
(A filling would go in at this point.)
Then increase the angle of the pan slightly, which will force the egg mass to roll over on itself with each jerk at the far lip of the pan.

As soon as the omelette has shaped up, hold it in the angle of the pan to brown the bottom a pale golden color, but only a second or two, for the eggs must not overcook.
The center of the omelette should remain soft and creamy. If the omelette has not formed neatly, push it with the back of your fork.
Turn the omelette onto the plate as illustrated on page 128, rub the top with a bit of butter, and serve as soon as possible.
GARNISHINGS AND FILLINGS FOR OMELETTES
Aux Fines Herbes
[With Herbs]
Beat into the eggs at the beginning 1 tablespoon of minced fresh herbs such as chervil, parsley, chives, and tarragon. Sprinkle more of the same over the finished omelette.
Au Fromage
[With Cheese]
After the eggs have set for 2 or 3 seconds in the pan at the point indicated in either of the two omelette recipes, sprinkle in 1 or 2 tablespoons of grated
Swiss or Parmesan cheese and finish the omelette. If you wish, sprinkle more cheese over the completed omelette, dot with butter, and run quickly under a very hot broiler to melt and brown the cheese.
Aux Épinards
[With Spinach]
Beat 2 or 3 tablespoons of cooked purée of spinach, page 469, into the eggs at the beginning, then proceed with the omelette as usual.
Other Suggestions
Sprinkle 1/4 cup of any of the following cooked ingredients over the eggs after they have set for 2 or 3 seconds in the pan at the point indicated in either of the two omelette recipes, then proceed with the omelette as usual:
- Diced sauteed potatoes and minced herbs
- Diced truffles
- Diced sauteed ham, chicken livers, or mushrooms
- Diced cooked asparagus tips or artichoke hearts
- Diced cooked shrimp, crab, or lobster
- Cubes of stale white bread sautéed in butter
Omelettes Gratinées à la Tomate
[Tomato-filled Omelettes Gratinéed With Cream and Cheese]
Here is a delicious supper or luncheon dish that can be prepared ahead
and gratinéed just before serving.
For 4 to 6 people
4 two-egg omelettes or 2 three-egg omelettes
A buttered plate
A shallow, buttered, fireproof serving platter
Cook the omelettes according to one of the master recipes, but leave them slightly underdone. Slip each as it is made onto a buttered plate, then slide it onto the buttered platter, arranging the omelettes side by side.
1 cup fresh tomato purée, page 78
Cut a slit along the length of each omelette to within 1/2 inch of the 2 ends. Fill the slits with the tomato purée.
(*) If not to be used immediately, rub tops of omelettes with softened butter and cover with waxed paper.
Preheat broiler to very hot.
1/2 to 2/3 cup whipping cream or crème fraiche, page 16
1/3 cup grated Swiss cheese
1/2 Tb melted butter
Just before serving, pour the cream over the omelettes, and sprinkle with cheese and melted butter. Set platter 3 inches from hot broiler for 1 or 2 minutes to reheat the omelettes and to brown the cheese lightly, but do not let the omelettes overcook. Serve immediately.
Pipérade
[Open-faced Omelette Garnished with Onions, Peppers, Tomatoes, and Ham]
This is a Basque specialty, and quick to make if the pipérade
mixture has been prepared in advance. As the omelette is not folded, and
is served in its cooking vessel, it is not a disaster if it sticks a
little on the bottom. You may therefore cook the eggs in a low, glazed
pottery dish, or a fancy skillet.
For 4 to 6 servings
8 to 12 strips of ham 1/4 inch thick and about 2 by 3 inches across
2 Tb olive oil or butter
An 8- to 9-inch enameled skillet
Brown the ham slices lightly on both sides in hot oil or butter. Set them aside, and reheat just before using them at the end of the recipe.
1/2 cup thinly sliced yellow onions
1/2 cup thinly sliced green or red bell peppers
Salt and pepper to taste
In the same oil or butter in which you browned the ham, cook the onions and peppers slowly, covering the skillet, until they are tender but not browned. Season to taste with salt and pepper.
1/2 clove mashed garlic
Speck of cayenne pepper
2 or 3 firm, ripe, red tomatoes peeled, seeded, juiced and sliced, page 505
Salt and pepper
Stir in the garlic and pepper. Lay the tomatoes over the onions and sprinkle with salt. Cover and cook
slowly for 5 minutes. Uncover, raise heat, and a few minutes, shaking the pan occasionally until the juice from the tomatoes has almost entirely evaporated. Season to taste, and reheat just before using.
(*) Recipe may be prepared ahead to this point.
1 1/2 Tb olive oil or butter
An 11- to 12-inch serving skillet or shallow, fireproof serving dish
8 to 10 eggs beaten lightly with 1/4 tsp salt and a pinch of pepper
A large table fork
2 to 3 Tb minced parsley or mixed fresh green herbs
Heat the oil or butter in the skillet or dish. When very hot, pour in
the eggs. Stir rapidly with a fork until the eggs have just set into a
creamy mass. Remove from heat and spread over them the hot
pipérade, mixing a bit of it delicately into the eggs. Lay
the warm ham strips over the pipérade. Sprinkle with the
herbs and serve immediately.
Excerpted from Mastering the Art of French Cooking by
Julia Child, Louisette Bertholle, and Simone Beck.
Copyright 2001 by Julia Child, Louisette Bertholle, and Simone Beck. Excerpted by
permission of Knopf,
a division of Random House LLC. All rights reserved. No part of this excerpt
may be reproduced or reprinted without permission in writing from the publisher.
|