| |
 |
"It's easy to grill a fillet but how do you handle a hoof?" --from Lidia Bastianich
|
 |
| |
 |
 |
|
 |
LIDIA'S ITALIAN-AMERICAN KITCHEN |
 |
|
 |
|
| |
| |
|
|
| |
| |
- 4 bunches arugala, stems trimmed and leaves cut in half
- 2 small heads of radicchio di Chicoggia or Trevisano, cores removed, leaves cut in 1-inch pieces
- 4 heads of endive cored, trimmed, and cut into 1-inch pieces
Salt
Freshly ground pepper
- 6 tablespoons extra-virgin olive oil, or as needed
- 3 tablespoons red-wine or balsamic vinegar, or as needed
Makes 6 servings
|
|
TRI-COLOR SALAD
Insalata Tricolore
This was one of the first dishes that brought the taste of contemporary Italy to the Italian-American restaurant scene. It came into vogue in the early seventies when red radicchio and arugula became available in the States. While the Indians will toss any vegetable in their salads, I think the addition of endive was a play on the color fo the red, green, and white Italian flag.
This salad is a great base for additions, from walnuts and pine nuts to different cheeses and cold cuts, such as salami or turkey, and even fish such as tuna, shrimp, or poached whitefish.
Wash and dry the arugula, radicchio, and endive. Store loosely covered in the refrigerator for up to one day.
Tumble the greens into a serving bowl an dseason them lightly with salt and pepper. Drizzle enough olive oil over them, while tossing gently, to coat the leaves evenly and lightly. Drizzle the vinegar over the salad, while tossing gently, until the balance of oil and acidity is to your taste. Taste and season with additional salt and pepper if necessary.
|
|
|
| |
| |
- 4 large Idaho (russet) potatoes (about 21/4 pounds), unpeeled, washed
- Salt
- 2 large eggs
Dash of freshly ground white pepper
- 3 cups unbleached all-purpose flour, or as needed
Makes 4 main-course or 8 appetizer servings

|
|
POTATO GNOCCHI
Gnocchi di Patate
It isn't hard to make featherlight gnocchi. The main thing to keep in mind is this: the less flour you add and thelkess you hand the dough, the lighter the gnocchi will be. The less moisture there is in the potatoes before you start adding flour, the less flour you will need, so the following tips for making light gnocchi all have to do with removing as much moisture from the potatoes as possible:
- Don't overcook the potatoes--their skins will pop open and the flesh will soak up water.
- Rice the potatoes while they are still quite warm and steaming--rubber gloves help.
Spread the riced potatoes out in a thin layer so the steam rising from them has a chance to escape.
Once you form gnocchi, they must be cooked or frozen immediately or they turn to mush. To freeze them, pop the tray with the gnocchi on them right in the freezer: When they are solid, scrape them into a resealable plastic bag.
Put the potatoes in a lare pot and pour in enough cold water to cover them by at least three fingers. Bring to a boil and cook until they are tender when pierced with a skewer, about 40 minutes. Lift them out of the water and let stand just until cool enough to handle. The hotter the potatoes are when you peel and rice them, the fluffier the riced potatoes will be. Scrape the peels off the potatoes and rice the potatoes. Spread the riced potatoes out in a thin layer to expose as much of their surface as possible to the air.
While the potatoes are cooling, bring 6 quarts of salted water to a boil in an 8-quart pot over high heat.
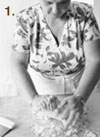
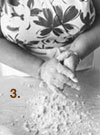
On a cool, preferably marble, work surface, gather the cold riced potatoes into a loose mound with a well in the center. Beat the eggs, 1 teaspoon salt, and the white pepper together in a small bowl until blended and pour into the well. Work the potatoes and egg together with both hands, gradually adding as much flour as necessary to form a firm but moist dough. Stop frequently as you mix to scrape up the dough that sticks to the work surface and reincorporate it into the dough. Forming the dough should take no longer than 10 minutes from start to end. The longer the dough is worked, the more flour it will require and the heavier the dough--and the finished gnocchi--will be. As you work, dust the dough, your hands, and the work surface lightly with flour as soon as the dough begins to feel sticky.
Forming Gnocchi: (See photos at left.)
- Work the dough with both hands.
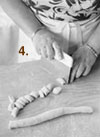
- Cut the dough in half (note the texture of the dough), and then cut each half into thirds.
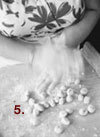
- Clean excess dough from your hands by rubbing them with some fresh flour.
-
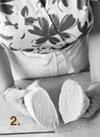
After rolling each piece of dough into a rope, cut crosswise into 1/2 inch pieces.
-
Roll each piece into a rough ball with your floured hands.
Press a dough ball against the tines with your floured thumb, while rolling downward against the tines.
-
Or press the dough ball against the nongrating side of a cheese grater.
Excerpted from Lidia's Italian-American Kitchen by Lidia Matticchio Bastianich Copyright 2001 by Lidia Matticchio Bastianich. Excerpted by permission of Knopf, a division of Random House LLC. All rights reserved. No part of this excerpt may be reproduced or reprinted without permission in writing from the publisher.
View more recipes from Lidia's Italian-American Kitchen
Read an essay about how the photographs in the book were shot
Visit Lidia's Italy, the author's personal website, to learn more
|
|
|
| |
|
|
|
|
THE GIFT OF SOUTHERN COOKING |
|
|
|
|
| |
| |
|
|
| |
| |
-2 cups granulated sugar
-1 1/2 cups freshly squeezed lemon juice
-1/4 teaspoon salt
-2 quarts bottled spring water, chilled
-2 lemons, washed and thinly sliced
-Fresh mint sprigs for garnish (optional)
|
|
LEMONADE
A refreshing summer treat like no other--and certainly better than any powder or mix you can buy. We recommend organic lemons, but in any case rinse the lemons well under hot water and wipe vigorously to remove the wax coating and the dye label. For party serving, we like to make a big block of ice to float in the lemonade--it looks lovely and keeps the drink cold.
Put the granulated sugar, freshly squeezed lemon juice, salt, and the water into a large crockery or punch bowl. Stir well until the sugar is dissolved, then add the lemon slices. Refrigerate until ready to use. Serve garnished with the optional mint.
NOTE: To make a block of frozen ice, put 1 quart of spring water into a 4-cup stainless-steel mixing bowl or a plastic container of the same size, and freeze several hours or overnight.
|
|
|
| |
| |
The Slaw
-1 large head green cabbage, cored and very finely shredded
-3 kirby cucumbers, peeled, seeded, and sliced paper-thin
-3 tablespoons kosher salt
The Dressing
-1/2 cup white vinegar
-1/2 cup granulated sugar
-1/2 teaspoon salt
-1 tablespoon Dijon mustard
-1/4 cup vegetable oil
-1/4 cup heavy cream
-2 tablespoons sour cream
-Salt and freshly ground pepper to taste
Makes enough to serve 6
|
|
COLESLAW
I had to make coleslaw for the first time in my life--and lots of it--when I became chef for the governor of Georgia in the late 1980s. Barbecues are big in Southern politics, and if you're doing barbecue, you must have coleslaw.
Here is the coleslaw I developed then and have made at home and in restaurants where I've cooked ever since. I based it on an unusually fine-textured sweeet-and-sour slaw made by a cook friend in Talla hassee. The to its texture is salting , resting, and squeezing, the shredded cabbage to get rid of excess liquid. Then you toss the shreds with a hot vinegar-sugar syrup, which softens and flavors them, and fold in sweet and sour creams. Although I've sometimes had to hand-squeeze nearly 100 pounds of cabbage for big parties, it's always worth the effort. In additon to barbecue, this is delicious with fried foods, like our fish, soft-shell crab, or chicken.
You can make the slaw just a few hours before serving, but it is even better if you start a couple days ahead: the salted cabbage can drain over one night, then steep in the sweet-sour dressing the next, before you mix in the creams.
Mix together the shredded cabbage and sliced cucumber in a large colander. Toss well with the 3 tablespoons salt, and leave to wilt for 20 minutes. Squeeze the slaw firmly by handfuls to extract as much liquid as possible, then use your fingers to toss and loosen the squeezed slaw. Toss it into a large bowl.
To make the dressing: Bring the vinegar, sugar, and salt to a boil in a small saucepan over medium heat, stirring just until the sugar is dissolved. Boil for 3 minutes, and whisk in the Dijon mustard and oil. Pour the hot dressing over the reserved slaw, and stir well to blend. Allow to cool slightly before stirring in the heavy cream and sour cream. Taste carefully for seasoning, and add salt and freshly ground pepper to taste as needed. Serve cold at room temperature.
|
|
|
| |
| |
-5 cups sifted White lily flour (measured after sifting)
-1 tablespoon plus 1/2 teaspoon Homemade Baking Powder:
(1/4 cup cream of tartar and 2 tablespoons baking soda)
-1 tablespoon kosher salt
-1/2 cup (1/2 pound) packed lard, chilled
-1 1/4 cups buttermilk
-3 tablespoons unsalted butter, melted
|
|
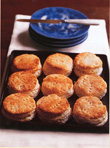
HOT CRUSTY BUTTERMILK BISCUITS
Here are the secrets to a great biscuit: soft Southern flour; Homemade Baking Powder; good, fresh, very cold lard; good, fresh, very cold buttermilk--anda very hot oven. Work the fat into the flour with your fingers; stir together and knead the dough as little as possible; don't twist the biscuit cutter when stamping out biscuits; and finally, place them on the baking sheet as close together as you can without touching.
Homemade Baking Powder: Sift all the ingredients together 3 times, and transfer to a clean tight sealing jar. Store at room temperature, away from sunlight, for up to 6 weeks.
Preheat oven to 500 degrees F.
Put the flour, homemade baking powder, and salt in a mixing bowl, and whisk well to blend thoroughly. Add the lard, and working quickly, coat it in flour and rub between your fingertips until approximately half the lard is finely blended and the other half remains in large pieces, about 1/2 inch in size. Pour in the buttermilk, and stir quickly just until the dough is blended and begins to mass.
Turn the dough immediately out onto a floured surface, and with floured hands knead briskly eight to ten times, until it becomes cohesive.
Gently flatten the dough with your hands into a disk of even thinness; then, using a floured rolling pin, roll it out to a uniform thickness of 1/2 inch. With a dinner fork dipped in flour, pierce the dough completely through at 1/2-inch intervals. Lightly flour a 2 1/2-inch or 3-inch biscuit cutter and stamp out rounds, without twisting the cutter in the dough. Cut the biscuits from the dough as close together as you can, for maximum yield. Transfer them to a parchment-lined baking sheet, placing them so that they just barely kiss. Don't reroll the scraps. Just arrange them around the edge of the sheet, and bake them--cook's treat.
Put the baking sheet immediately on the center rack of the preheated oven. Bake 10-12 minutes, checking after 6 minutes or so, and turning the pan if needed for even baking. When the biscuits are golden brown, remove from the oven and brush the tops with the melted butter.
Adapted from THE GIFT OF SOUTHERN COOKING by Edna Lewis and Scott Peacock. Copyright 2003 by Edna Lewis and Scott Peacock. Excerpted by permission of Knopf, a division of Random House LLC. All rights reserved. No part of this excerpt may be reproduced or reprinted without permission in writing from the publisher.
Read a current Newsweek article about the authors
View more recipes from the book as featured in the Atlanta Journal Constitution
|
|
----------------------------------------------------------------------
You received this newsletter because you have subscribed to our mailing list.
To unsubscribe, send a blank message to unsub_knopfrecipes@info.randomhouse.com
If you received this newsletter as a forward and wish to subscribe, send a blank message to sub_knopfrecipes@info.randomhouse.com
|
|

 Happy Cooking,